Migrating from Jekyll+Github Pages to Hugo+Netlify
During the last 18 months, working on my Web site became a daunting task—be that for developing, redesigning it, writing a blog post, or making updates to my speaking and workshop pages. My then static site generator, Jekyll, is why. And a change has long been overdue...
Jekyll became unbearably slow at compiling my Web site after every change I made. Until, at one point, waiting for the site to compile became a torturous, life-sucking process that I wanted to avoid at all costs.
This may sound exaggerated, but I promise you it’s not. Jekyll became way, way too slow. “Too slow” is actually an understatement. Recently, every time I changed a CSS property or made any change in the HTML I had to wait up to five minutes for that change to be picked up and compiled by Jekyll. I am, once more, not exaggerating. Jekyll used to literally just… freeze. I’d have to ctrl+C my way out of the freeze and then run it again for it to pick up the changes and finally compile. And if I made many changes in a row, my Macbook would heat up so much and the fan would go so crazy that it sounded like an airplane about to take off.
My site is relatively small, I’d say. I have less than 100 blog posts. Less than 60 at the time of writing of this article, actually. And only a few static pages. I don’t use heavy JavaScript. In fact, I barely need to use any JavaScript. And yet, Jekyll still choked every time it had to compile it.
Yes, I did use Jekyll flags such as --incremental and every single other flag and setting that I found or that someone recommended to speed up the compiling process. But no, it did not help.
I can’t even emphasize how bad it got during the last year. I would literally feel the stress hormones increase in my blood stream every time I so much as thought about making a change to my Web site. I knew I would be about to give myself one hell of a bad time doing so.
But I knew that this couldn’t go on forever. I knew I’d have to ditch Jekyll and migrate to a new generator at some point. I just never found the time to do so. Actually, to be more honest here, I never made the time for it because every time I had time off a project I wanted to make the most out of that time by staying away from my computer. My site was just not a priority, especially since I’d been very much still undecided about what to use as an alternative. So I kept stalling.
But recently, knowing I had a couple of weeks off to do practically anything, and since I’ve been having a lot of ideas for my blog that started piling up and that I really want to get out there, such as a setting up a newsletter, tweaking the design, improving the code (which is still WIP), adding a new type of content section (coming soon) and a few more ideas, I finally managed to put my head into it and do it, because I want to get my ideas out, and write a few blog posts. But I needed to start enjoying working on my Web site again, first. So I finally thought to myself: “That’s it. I’m just gonna have to put my head down for a few days this week and dedicate my time to moving to the new static generator”. I knew this was a necessary and extremely useful time investment that I just had to finally make. I put my mind to it, and just did it. (This is the most effective way to be productive, really: Just do it.)
Choosing a static site generator
As I mentioned earlier, one of the reasons I didn’t make the switch earlier to another generator was because I didn’t know which one I wanted to use. Several Twitter friends suggested a few of the many available options. But I never felt comfortable with any of them. You see, everyone has some way that their brains work, and some way they like to organize their files, directories, and work, that works for them. None of the static generators I saw gave me everything I wanted and needed for my site. Until someone once suggested having a look at Hugo.
I took a few minutes to read the docs, just to get an idea of what to expect and what Hugo had to offer—to get a first impression of it, so to speak. After reading a little into the content structure and organization section and learning how Hugo offers the ability to create many different content categories and sections, plus all the general flexibility it provides, I thought that this was the static site generator I’d always wanted and needed. The organization and structure looked exactly like what I had imagined my own site to have.
But what made me settle for Hugo out of all other options was seeing how incredibly fast it is compared to Jekyll. Not only has every single blog post I read online made a comparison and proved this, but I also got to experience this speed first hand while working on the Smashing Magazine redesign.
The new Smashing Magazine (currently at next.smashingmagazine.com) uses Hugo as a static site generator. The setup that I got to use while building the front-end of the magazine was so blazingly fast that I had absolutely no doubt that the results I was reading about were true. And since my site is much smaller than Smashing Magazine, I knew I had nothing more to worry about. I mean, if Smashing Magazine can be compiled so ridiculously fast, how could my blog not be?
Please note that this is in no way meant to be a comprehensive guide to Hugo. There are still some bits and pieces that I am figuring out myself, so I'm in no position to write a comprehensive guide yet. You will find that you will also need to read through the Hugo docs for more details on the topics I’m going to be talking about. Think of this post as a helper that can help guide you where to start (and sometimes what to do) for certain particular Hugo topics. And finally, this is not a comparison post between Hugo and Jekyll. This is more of a Hugo starter tips kind of article. If you’re considering Hugo as your new static site generator, I hope you find some useful tidbits in here to help you get it up and running.
Setting Hugo up
Setting up Hugo isn’t complicated. The docs include two guides: one for installing Hugo on a Mac, and one for installing it on Windows. From here on forwards I’ll be referring to a Mac setup since a Mac is my main work machine.
I used brew to install Hugo:
$ brew install hugoI followed the instructions in the installation page and updated brew and ran a few other commands to ensure everything was installed and working as expected. That’s all you need to get Hugo to work and run on your machine. It can’t get any simpler than that. With Jekyll, installation didn’t go as smoothly as I remember spending quite a lot of time to get it set up and running back then.
I tend to be a lazy developer sometimes. But that can be good because it pushes me to find the fastest and simplest way to accomplish a task. So the first thing I wanted to do in making the switch to Hugo was a way to automatically migrate all my blog posts without me having to go over each and every one of them to change the front matter in each one. (Seriously, I would have aborted this whole operation if I had to do that. 😅)
Fortunately, as of version 0.15, Hugo provides a one-liner to migrate from Jekyll. You type the following line into the terminal—replacing jekyll_root_path and target_path with the paths to your current Jekyll directory and the directory you want to set up your new site in, and Hugo will import your current Jekyll site’s files into a new Hugo site directory for you:
hugo import jekyll jekyll_root_path target_pathIf you’re not importing a Jekyll site, you may want to check the corresponding docs out, detailing what you need to know about folder structure in Hugo, such as where static assets go, where content and layout templates go, and more.
The next step is to convert your Jekyll templates into Hugo templates, and this is where the bulk of the work is, and where I ended up bumping my head into the walls quite a few times. (But believe me, the end result I have now is very much worth it. Plus, I’ve learned a lot. I’ll be sharing some of what I learned in the next section.)
You may be a different kind of lazy developer. For example, you may prefer to start with a boilerplate that provides you with the setup you need, and that is ready for you to start adding content to right away, especially if you're starting a blog from scratch. In that case, I highly recommend Netlify’s Victor Hugo boilerplate, which comes equipped with everything you need to even get Webpack and Gulp up and running in your site’s Workflow as well. The structure the boilerplate provides is slightly different from what I have below, but not too much.
Diving into Hugo: Technical details
Let me start by saying this: at some point during the migration, I was just tweaking stuff, changing values, names, file names, structure, etc. in the hopes of something magically working and when it does I would go like: “I have no idea how or why this worked.” And as someone else mentioned on Twitter, apparently I’m not the only one who’s had such moments with Hugo. So I’m hoping this (fairly long) post will help some of you thinking about making the switch to Hugo, hopefully saving you some headaches along the way.
Disclaimer: There’s a lot about Hugo that I still don’t know how to do and find myself Googling sometimes. But I’ve got all the basics and everything I need for now all up and running, and yes, I do know how and why everything I have working now is working the way it is. So, let me share some of that stuff with you. I’ll also share some of the extremely useful articles I found that helped me as well. So think of this article as an idea dump, and a set of reminders for my future self to get back to if I ever get confused again about the basics.
Please note that not you may end up not using the same process or directory structure I am using. In fact, I am sure that you won’t, unless you have the exact same content types as I do—which is highly unlikely. Also note that yo may find a better way of doing some of the things I am doing now, which is also good. And if you’re already a Hugo pro and find that some things could be done in a better way, please do feel free to share your ways for the rest of us to learn from.
Hugo Folder Structure
My site’s local directory structure currently looks like this:

The folders you see in the image above, apart from node_modules, are the ones that Hugo generates for you when you import your site from Jekyll, and these are also the ones you would normally create and set up for a Hugo site. The files at the bottom are the files needed or used by Github and Gulp. The only file that is also used by Hugo is the config.toml file.
config.toml contains the site’s configuration variables such as baseURL among many other variables that you may or may not decide to use. It is similar to Jekyll’s yaml configuration file. The Hugo docs provide a long list of available variables and everything you need to know to set up a config file that works for you in this page. My config file contains very few variables for now.
/public/ is the directory your compiled site will live in. This directory is similar to the the dist directory used in most apps’ directory structure. The rest of the directories are where the dev process happens.
The static directory is where static content such as images, css and js files, audio, video, talk slides, etc. live. It is where I find I spend most of my time working.
After working on the Smashing Magazine redesign I also learned that your structure can be different from the above. The basics are the same, but if you use something like Netlify’s Victor Hugo boilerplate, your setup would be a little different, but the main concepts of what is compiled to where remains almost the same. Also note that the Victor Hugo boilerplate is a fantastic place to start if you want to move to Hugo and use Webpack and Gulp in your workflow. I found Webpack to be overkill for my site given how little JS I have here, but if you do need it, I highly recommend using the boilerplate. I also prefer building from scratch so I can learn the ins and outs of how things work. Whatever works for you, go for it.
Creating and laying out content
For any kind of content you want, be that a static page, a blog post, an index page (for articles, case studies, etc.), you need to create an .md (markdown) file in the /content/ directory. This is where all the content is “defined”. After creating the content in its specified directory, you then create (or re-use) a layout template from the /layouts/ directory to lay that content out.
Every .md file in the /content/ directory corresponds to a page and starts with the page’s front matter, which can be written in either yaml or toml format. Since I wanted to get the feel of a whole new environment, and since most Hugo docs and resources use it too, I decided to use toml. Jekyll uses yaml.
I won’t go into the details of the difference between the syntax used by Hugo versus that used by Jekyll. The Hugo docs as well as, well, Google, do a great job at explaining the differences, so feel free to research further and get back to this article once the differences are clear. I personally did have to spend quite some time learning the new syntaxes (toml, Go templating, etc.) before I felt comfortable using them. But they don’t have a steep learning curve, so don’t let the new syntax intimidate you if you’re not already familiar with it.
Defining Content Types (or Declaring types of content)
Every page’s front matter defines the type of the page/content, which in turn defines what template will be used to lay it out. The type of the page is defined using the type variable. For example, the front matter of an article in the blog section on my site looks like this:
+++
type = "blog"
description = "..."
title = "..."
date = ...
...
+++
The type value an be practically anything, and this is where one of Hugo’s powers truly shines. You can define as many content types as you want. For example, I currently have five types of content on my site: static (pages such as About and Hire), blog (articles like the one you’re reading now), workshops, case studies, and desk (which is a new kind of posts that will be coming soon). I can create as many more content types as I want in the future.
A new feature is being rolled into Hugo now that allows you to create subsections of content, too! This would allow you to, say, create design and development subsections in the articles section, and much, much more. It’s an exciting new addition to the CMS.
The following screenshot shows what the /content/ directory of my site currently looks like:
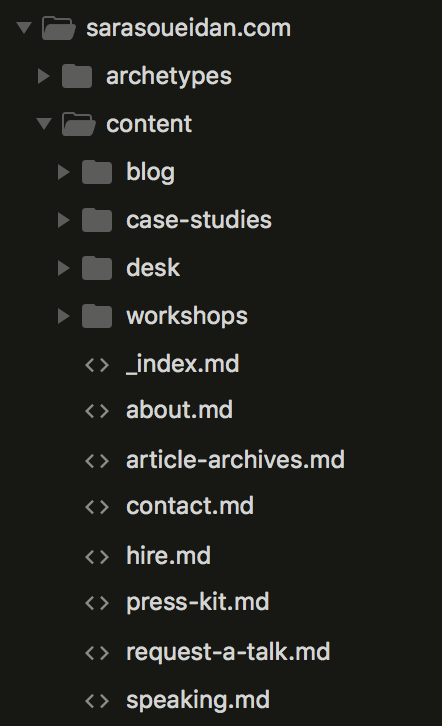
content directory on my Web site.Static pages are created as individual .md files in the root of the /content/ directory. Other kinds of content that would need an index page (such as articles, workshops, case studies, etc.) are created inside directories that are named after the content type. For example, workshops are created inside a /content/workshops/ directory. My articles live inside the /content/blog/ directory. Directories like these are also referred to as sections.
For every piece of content, you need to define the type of that content. And that can be done in two ways.
The type of the static pages is defined using the type variable, which is in the page’s front matter. The type for the four sections (blog, workshops, case studies and desk), however, is defined using directory structure. When you use directory structure to define a type, you don’t have to define the type in the front matter anymore. For example, a blog post lives inside the blog directory, so its type is automatically set to blog. You don’t need to redefine that type in the front matter of each post.
You can use either the type variable in the front matter or the directory structure way to define content type. Generally, you would use the type variable to define and create static pages; and use the directory structure to define content that requires an index page, such as blog posts.
An important and useful thing to know here is that when you define the type of the page using the type variable, the page can be placed anywhere inside /content/ directory and the directory structure will be irrelevant. Meaning that you could define a page of type static and place it inside the blog directory, and Hugo will still see it as a static page, and consider its location in the blog folder irrelevant.
But… irrelevant for what? The answer is: to choosing which layout template to use.
You see, each content type will be “mapped” to a certain layout template. You can have different types use the same template, too. I’ll talk more about layout in the next section. But first, let’s create a couple of content pages: two static pages (Homepage and About, for example) and an index page for the blog posts.
But before we do that, I want to point out a note about creating index pages for different sections or types.
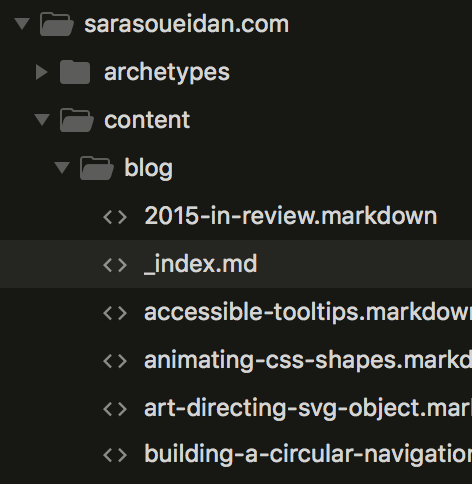
The blog section needs to contain an _index.md file inside the /content/blog/ directory. This file is the index page for this section (where we will display a list of all the posts). The /content/blog/ directory will also host the individual blog posts as well. Check the following screenshot out for a more visual example:
Similarly, any and every other content type (or section) will have an index page as well as the individual posts in that section.
So, let’s start creating some pages.
The homepage
The homepage is created by creating an _index.md file inside /content/. You can see it at the top of all static pages in the folder structure of the screenshot above.
The homepage is the only exception to the other pages when it comes to layout in that it will require its own layout in the /layouts/ folder (we’ll talk more about layout in an upcoming section) and that layout template has the same name: index.html.
In the front matter of the /content/_index.md you define the type of the page as well as give it a title and description.
The front matter of my homepage looks like this:
+++
type = "page"
title = "Home"
description = "Sara Soueidan — Front-end web developer, author and speaker"
+++
The description is used in the header partial of the site as a <title> value like so:
<title> {{ .Page.Description }} </title>The reason I’m not using the title value as the <title> in the HTML is that, in other pages, the title of the page is used as the name the page will get in the main menu. More on this later.
An .md file in the /content/ directory can contain both markdown and HTML. So for the homepage, and since I have no dynamic content such as post listings, I only have the HTML of the page in there. But how does this markdown/HTML content get laid out, and how do we include the header and footer of the page? That all happens in the layout template.
The /layouts/index.html file is the layout used for the homepage. And this is what it looks like:
{{ partial "homepage-header.html" . }}

{{ .Content }}

{{ partial "footer.html" . }}
{{ .Content }} pulls the content from the corresponding page in the /content/ folder. So, for the homepage here, it pulls the content of the homepage from the /contents/_index.md file.
Additionally, I’m calling the homepage header as well as the site footer in here using partials.
By default, when you require partial "footer.html" ., Hugo will look for the partials—any partial—inside a partials directory which in turn is located inside the layouts directory.
Refer to the Hugo docs on partials for details on what the dot at the end of the statemenet refers to and what it does, and how you can customize partial calls.
And that is how you create the homepage for your site: a /content/_index.md file that contains the homepage content, which is then called and laid out using /layouts/index.html.
Adding a static page
After I got the homepage set up, I wanted to set the rest of the static pages up before moving on to the more dynamic content. So I set out to build the About page.
I had to do a lot of Googling and reading help threads in the Hugo forums and elsewhere to figure this one out. So I hope this post will be most beneficial when it comes to creating static pages—which, surprisingly, turned out to be quite simple.
Static pages are created in the root of the /content/ folder, just like the homepage. However, unlike the homepage, the file names will not start with an underscore.
Also unlike the homepage is the fact that you will need to specify the type of the page as well as tell Hugo to include it in the site’s main menu, give it a title and a description.
For the About page of my site, I created a /content/about.md file. The front matter of the page looks like the following:
+++
type = "static"
page = "static/single.html"
title = "About & Interviews"
description = "About Sara Soueidan — Front-end web developer, author and speaker"
menu = "main"
weight = "1"
+++
Notice the type value. As I mentioned before, you can specify any type in there. I used static because it literally describes the type of this page. (You’ll also find a lot of online resources using this type for static pages, too.)
The page variable is telling Hugo which template in the /layouts/ directory to use.
It is worth noting here that Hugo will automatically use this template even if I don't tell it to. But I remember banging my head against the wall a lot at first when I was trying to figure out how to use the layouts for the pages. I didn't know which layout was going to be used. Despite reading the docs, I still found myself doing and undoing a lot of things and then seeing things work and not work like some sort of magic. Hugo felt like a black box at first that took me a few days to figure out enough to feel comfortable writing about it. When it finally worked, I decided not to touch the front matter anymore because I was afraid I may end up breaking the layouts again. But now that I know better, it's useful to note that you don’t really need the page variable in there.
The title will be used as the title of the link in the menu. (If you look at the menu at the top of this page, you’ll see it as “About & Interviews”).
The description is used in the header partial as mentioned before as a <title> for the page (which you can see in your browser‘s tab description.)
The menu variable tells Hugo that this page should have its own link in the main menu.
The weight variable is very useful because it allows you to control the order in which your items appear in the menu. If you don’t use it, Hugo will use its own default order, which is not the order I wanted on my site. You can set weights in negative values as well.
I will leave the details about using and setting up the main menu for you to research and read about in the Hugo docs for brevity’s sake and because, whether I like to admit it or not, I’m still a little confused about some aspects of the menu; but I got to a point where I had it working the way I wanted it to and then decided not to touch it anymore because I was afraid I would end up breaking it. Again. 😂
All other static pages are created similarly. The only thing that’s different for each of them is the title and description as well as the order in the menu. The layout used is the same for all of them.
I’d like to note something here that we will get back to later:
Hugo has a specific order in which it chooses which layout to use for every page you create in /content/. We will talk about this more in the layouts section below. So had we not specified a /layouts/static/single.html as a layout template, it would have used a different template from a default folder inside /layouts/. More on this later.
Last but not least, and just like the homepage, the HTML content of the about page is placed in the about.md file, and then pulled into the /layouts/static/single.html template using {{ .Content }}, with a call to the header and footer partials as well. Note how the static type has a corresponding static folder in the /layouts/ directory that contains its layout template.
You don't have to place all the HTML in the markdown file. You can always place the layout HTML such as container elements et al in the layout template, and only have the text content inside the markdown file. I only do it this way because I like it this way.
Content Archetypes
You may have noticed in the screenshot above that I also have a folder called /archetypes/ at the root of my site. This directory is also related to the content types you create. But it has a specific and very useful purpose.
To explain the purpose of this directory, I’m going to first quote the corresponding page in the Hugo docs:
In Hugo v0.11, we introduced the concept of a content builder. Using the CLI command
hugo new [path/to/my/content], an author could create an empty content file, with the date and title automatically defined in the front matter of the post. While this was a welcome feature, active writers need more flexibility. When defining a custom content type, you can use an archetype as a way to define the default metadata for a new post of that type. Archetypes are quite literally archetypal content files with pre-configured front matter. An archetype will populate each new content file of a given type with any default metadata you’ve defined whenever you run the hugo new command.
In other words, defining an archetype allows you to speed up your content creation process, because it will populate the front matter of your new page with all the variables you want it to.
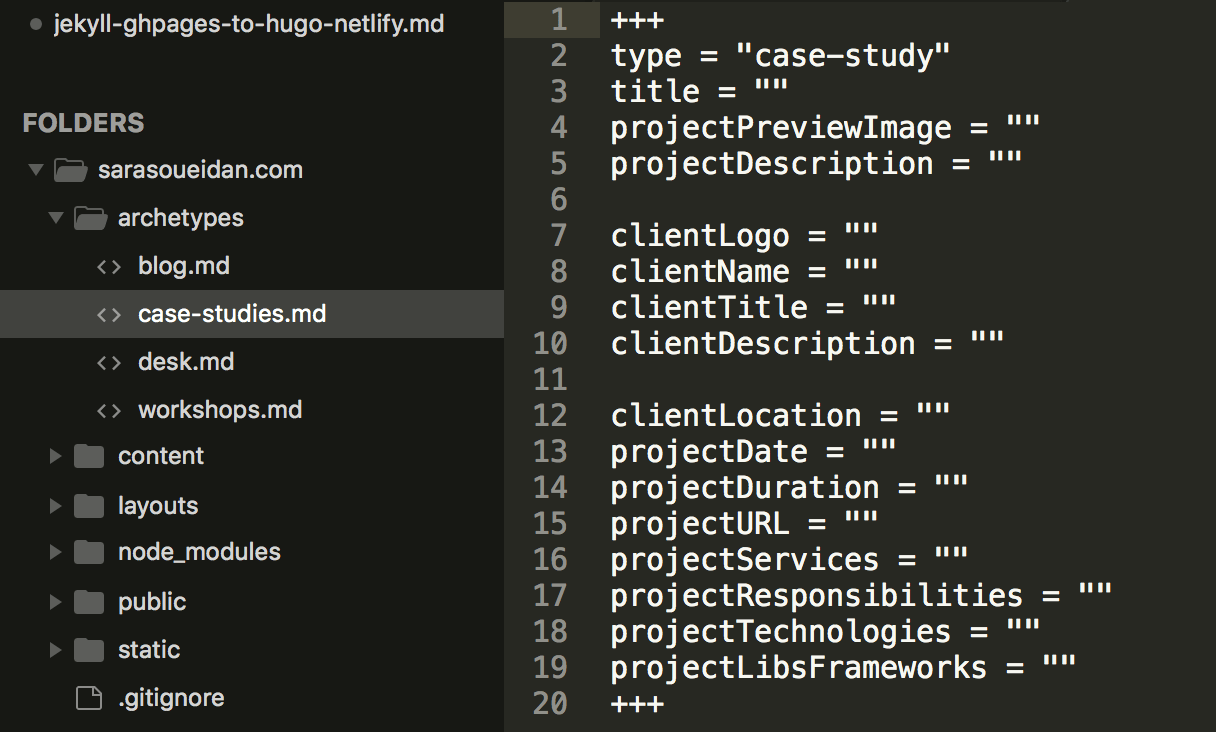
For example, suppose I want to create a new case study (which would go in /content/case-studies/). Instead of going into the directory and creating a new .md file for the new page, I can type this one-liner into the terminal and Hugo will create the new file for me:
hugo new case-studies/my-new-case-study.mdAnd the new case study (my-new-case-study.md) will automatically be populated with variables for: client name, client logo (path to the image), client description, project description, project date, … and many more. The values for these variables will be empty by default, ready for me to fill them up with their values.
The following image shows the variables I have defined in front matter of the case-studies archetype:
Also note the other archetypes I have defined in the
archetypes directory that correspond to the other four type sections I have on my site.
That’s pretty much all there is to know about archetypes. You can read more about them in the Hugo docs page. They’re pretty handy. You don’t absolutely need to define them, but I reckon you’ll want to.
Laying content out with page layouts and creating an index page for posts
This is the part that got me the most confused at first. How do I know which layout will be used for this section? How do I know how many templates needs to be in each one or whether I need any at all?
I did a lot of fiddling around, Googling, and, mostly, just trial and error until I managed to make the layouts work. Then I started breaking them so I could understand how and why they worked. I can now finally confidently say that I’ve got the hang of them.
Generally speaking, if you’re creating a very simple blog, you will only need two default templates: list.html and single.html.
The list.html would be used for the pages whose role is to display a list of items, such as the blog’s index page where you see the list of all blog posts you have.
The single.html, as you may have already guessed, is used to lay out the single pages such as the individual blog posts.
These two templates would go in a /_defaults/ directory inside /layouts/.
So, if you create a blog with a few posts and don’t give Hugo any special instructions about how to lay their content out, it will go looking in /layouts/_defaults/ for templates to use.
I have these layouts in place as a fallback. But I override them.
You can override the default templates by providing templates that fall under the same section name or content type as your content.
In other words, you can create a similar directory structure in the /layouts/ directory to the one you have in the /content/ directory, and Hugo will follow that structure to determine which template to use.
Or, you can create a directory that has the same name as a type you’ve defined in the content directory, such as the static type we defined for the static images. Hugo will then use the template inside /layouts/static/ as a template for all the pages that have type = static, instead of using the default templates.
For example, I created a /layouts/static/ directory, and inside that directory I created a single.html file, which Hugo will use to override /layouts/_default/single.html to lay out the static pages.
Once again, the /layouts/static/single.html page is just a template containing the following:
{{ partial "header.html" . }}

{{ .Content }}

{{ partial "footer.html" . }}
where the content of the template is pulled from the respective markdown. So, the generated about.html page is in fact the above /layouts/static/single.html page, with the {{ .Content }} pulled from /content/about.md.
Now, to create an index page for a list of posts as well as the posts I want to list, such as the blog page and the articles it lists, or the workshops page and the workshop details pages, we do something very similar.
Just like we created a directory for the content type defined using type that has the same name as the type itself, we create a directory for each of the other content types that were initially defined using directory structure, and we give that directory the same name as the directory name it has in the content folder.
Or: just like we created a folder in /layouts/ named after the content type, we create a folder for each of the content sections (blog, workshops, etc.) and name the folder after the section, so we end up with the same directory structure inside /layouts/ as the one we have in /content/.
Confused yet? Don’t be. Here is what it looks like for my site:
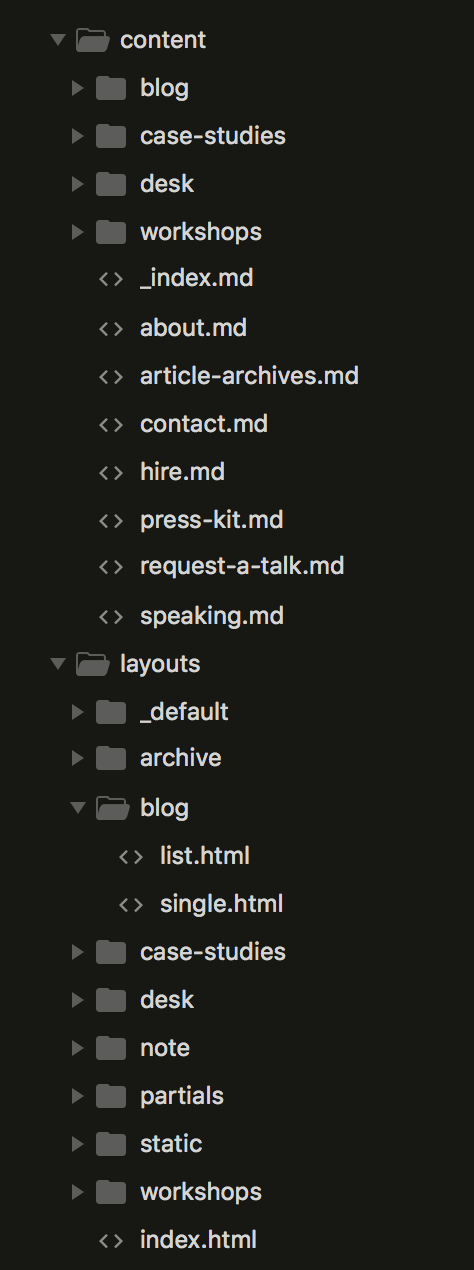
Let’s take a look at the blog section again. The /content/blog/ directory has a corresponding /layouts/blog/ directory.
Inside the /content/blog/ directory I have an index page: _index.md and the blog posts.
Inside /layouts/blog/ I have a list.html template as well as a single.html page.
Hugo will use the list.html template for the _index.md page and the single.html template for each of the individual blog posts.
Similarly, each of the other sections also gets its own layout directory containing a list.html and single.html template.
As I mentioned before, you don’t really need all these layouts. And you may have noticed that a few layout pages I have are exactly the same except for their names. The reason I’m doing this is for future flexibility. If I ever want to change the layout for one type or section, I’ll just have to modify its corresponding layout template. If your site is simpler than mine and does not have as many content types, you’ll probably not need to do as much as I did here.
The only exception to the layouts directory structure rule is the homepage, whose layout template is placed in the root of the /layouts/ template, named index.html.
Please note that it is important that you check out the default order in which Hugo chooses the template for each page. I highly recommend you do so.
To quote the docs:
Hugo uses a set of rules to figure out which template to use when rendering a specific page.
Hugo will use the following prioritized list. If a file isn’t present, then the next one in the list will be used. This enables you to craft specific layouts when you want to without creating more templates than necessary. For most sites, only the
_defaultfile at the end of the list will be needed.
Users can specify the type and layout in the front-matter. Section is determined based on the content file’s location. If type is provided, it will be used instead of section.
You can learn more about this order prioritization in the corresponding page in the docs.
Looping through section lists
The last point I want to talk about in the technical Hugo section is listing the posts of a section in that section’s index page.
Again, let’s take the blog in /content/blog/ as an example.
Markdown files will, of course, not include any templating logic. So, to list all the posts of the blog, we’ll need to do that in the layout template corresponding for that index page, which is located in /layouts/blog/list.html. The loop and all other templating logic is written in Go.
Now, the loop itself can and will probably be different for a lot of you. After Googling around a lot, I managed to end up with the following loop, which shows the latest five posts and then calls the pagination partial after the loop:
<ul class="articles-list">
<!-- Ranges through content/blog/*.md -->
{{ range (.Paginator 5).Pages }}
<li class="post">
<a class="post-title" href="{{.RelPermalink}}">{{ .Title }}</a>
<span class="post-meta"><time>{{ .Date.Format "January 2, 2006" }}</time> {{ if .Params.External }} — <span class="post-host">for {{ .Params.External.Host }}</span> {{ end }}</span>
<div class="post-summary">
{{ .Summary }} <!-- automatically takes the first paragraph in the .md article -->
</div>
<p><small><a href="{{.RelPermalink}}" class="read-more-link">Read more ››</a></small></p>
</li>
{{ end }}
</ul>
{{ partial "pagination.html" . }}Don’t judge the HTML in that loop yet. I haven’t worked on my site in a long time. It needs and could use some improvement. The markup will change soon.
The {{ range .Paginator.Pages }} part is the key here. Each .Paginator you use in any section’s index page will loop through and display the posts in that section. The (.Paginator 5).Pages tells Hugo to only list five posts. The loop in the code above will go over the posts in the blog section, listing only the most recent five. A similar loop in the layouts/workshops/index.html file would loop over the workshops inside /content/workshops/ and display a list of the posts in there.
I'm still confused by some of the global site and page variables in Hugo. I'm currently good with what I have and am using, but if I ever need more flexibility, options, functionality, I will need to dig more into the docs and get a lot more out of Hugo’s logic than just a simple loop. You should too.
As for the pagination.html partial, mine currently looks like this:
{{ $baseurl := .Site.BaseURL }}
{{ $pag := .Paginator }}

{{ if gt $pag.TotalPages 1 }}

<nav class="center pagination">
    {{ range $pag.Pagers }}{{ if eq . $pag }}<span class="pagination__button button--disabled">{{ .PageNumber }}</span>{{ else }}<a class="pagination__button" href='{{ $baseurl }}{{ .URL }}'>{{ .PageNumber }}</a>{{ end }}{{ end }}

    <div class="clearfix">
        {{ if .Paginator.HasPrev }}
        <a class="pagination__button pagination__button--previous" title="Previous Page" href="{{ .Paginator.Prev.URL }}">
            Newer Articles
        </a>
        {{ else }}
        <span class="pagination__button pagination__button--previous button--disabled">Newer Articles</span>
        {{ end }}

        {{ if .Paginator.HasNext }}
        <a class="pagination__button pagination__button--next" title="Next Page" href="{{ .Paginator.Next.URL }}">
            Older Articles
        </a>
        {{ else }}
        <span class="pagination__button pagination__button--next button--disabled">Older Articles</span>
        {{ end }}
    </div>

    <a href="../article-archives/" class="button button--full">See a list of all articles</a>

</nav>

{{ end }}
Feel free to dig into the variables more and learn more about them. I find that the code above is understandable as it is, but, again, if you need more functionality, the docs and forums would probably be able to help more.
Creating an Archive page
In addition to the default blog page, I wanted to add an archive page that lists all of my articles in one pagination-less page. This was not as straightforward as I’d hoped it would be. The docs didn‘t help me much and I again found myself Googling. I came across this extremely useful article, and pretty much used the same technique the author is using.
For the archive page, I created a static page inside /content/ and gave it a new type: archive. The page will use the layout inside /layouts/archive/single.html.
Inside the layout template, I loop through the articles using a loop similar to the blog’s loop, but with an important modification:
<!-- /layouts.archive/single.html -->
{{ range where .Site.Pages "Type" "blog" }}
<li class="post">
<a class="post-title" href="{{.RelPermalink}}">{{ .Title }}</a>
<span class="post-meta"><time>{{ .Date.Format "January 2, 2006" }}</time> {{ if .Params.External }} — <span class="post-host">for {{ .Params.External.Host }}</span> {{ end }}</span>
<div class="post-summary">
{{ .Summary }} <!-- automatically takes the first paragraph in the .md article -->
</div>
<p><small><a href="{{.RelPermalink}}" class="read-more-link">Read more ››</a></small></p>
</li>
{{ end }}Heads up: .Site.Pages will loop through all pages you have on your site. In other words, it will list every single .md file you have inside /content/. In order to tell Hugo to only display posts inside the /content/blog/ section, you “filter” the pages using "Type" "blog". Similarly, if you want to create an archive page for a different section, use that section’s type name as a filter.
And that’s it.
Hosting on Netlify
Github pages was my choice for hosting this Web site over the last couple of years. At some point, it started coming short. There also seemed to be some weird caching issue happening all the time where I found myself having to push changes to the repository twice in order for the latest change to show up (I guess the cache may not have been invalidated whenever it needed to). So I’d start creating “dummy commits” only to clear the cache and be able to see the changes I’d made live.
Now, I’m not sure if this was indeed a cache problem, although that’s exactly what it seemed like it was. I also don’t know if anyone can replicate this issue. No, I haven’t asked Github support about it. I’ve hated my Web site so much that I kinda thought “I’ve got a lot worse happening locally to even worry about this online issue”, so I just ignored it all along.
I also saw how blazing fast Netlify was when I worked on Smashing Magazine. Netlify also offers to “make your site or web-app many times faster by bringing it closer to your users. Instead of a single server, push to a global network of intelligent CDN nodes that also handle asset fingerprinting, automatic caching headers, and smart redirect & rewrite rules.”
And to top that off, if you’re a developer and/or you’re doing open-source work, Netlify offers you a free Pro subscription for life. All they ask for in return is a mention of Netlify on your site or application. For me, this was no issue at all as I always mention where my site is hosted in the footer. So, I signed up for the free Pro subscription. Free, fast hosting! Woohoo!
It only takes a few clicks to get your site up.
- Create an account on netlify.com
- Link your Netlify account to your code repository. Mine is hosted on Github so I just connected it (you do all this from the Netlify dashboard).
- Specify the build destination folder as well as a build command.
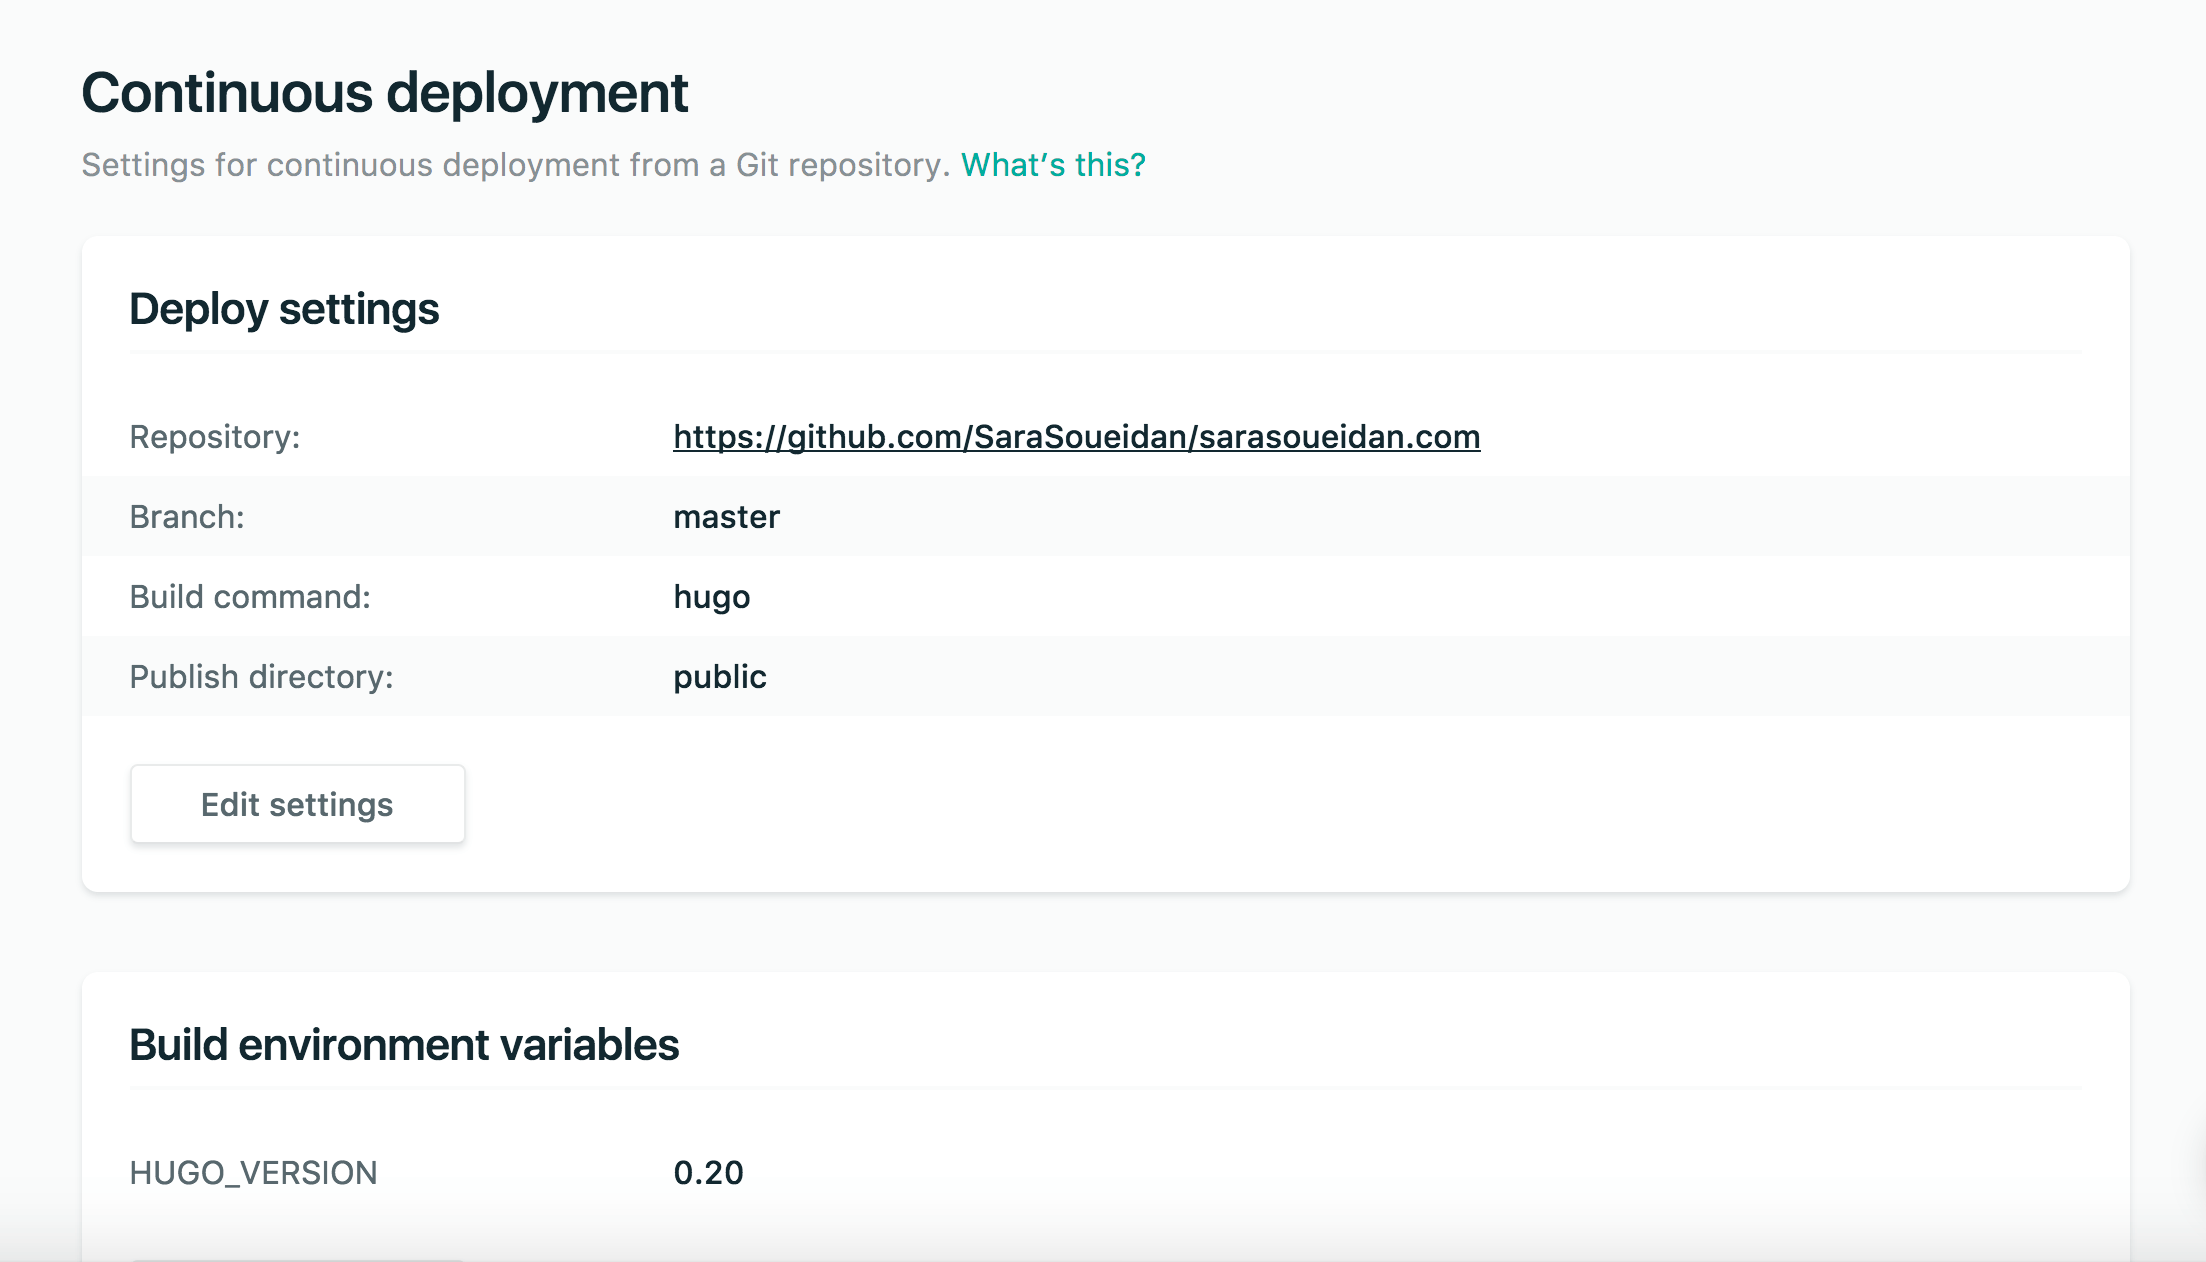
hugois the build command I used, andpublicis the build directory. (See screenshot below.) - Set up a custom domain. This also includes making some DNS changes.
- It took literally only 3 clicks to get an SSL certificate and HTTPS running for the site.
- And… well… you’re done.
I should probably mention that I did face a couple of annoyances while I was making the switch but it was not Netlify’s fault. And the Netlify team was super helpful and swiftly debugging the issues I was having. After making some DNS changes in my domain registrar’s dashbard, it took a few hours for my site to be online on my custom domain.
A couple of tips worth mentioning:
- Add your local
/public/folder to your.gitignorefile. Netlify will build your site for you on their servers. In order to avoid any possible conflicts, don’t push your public directory to the repo. I keep mine local now. I had an issue with some templates rendering when I was committing it before. - Check the Hugo version you’re using (
hugo version) against the version that Netlify uses. I had some build errors preventing the deploy at first which were a result of my version being ahead of that of Netlify’s. Let the team know if you face any similar issues so they can add a build environment variable to your site to match your local version.
Here’s what a part of my Netlify dashboard looks like:
I also love that Netlify provides options to optimize and bundle assets for you, improving your site’s overall performance sometimes as well.
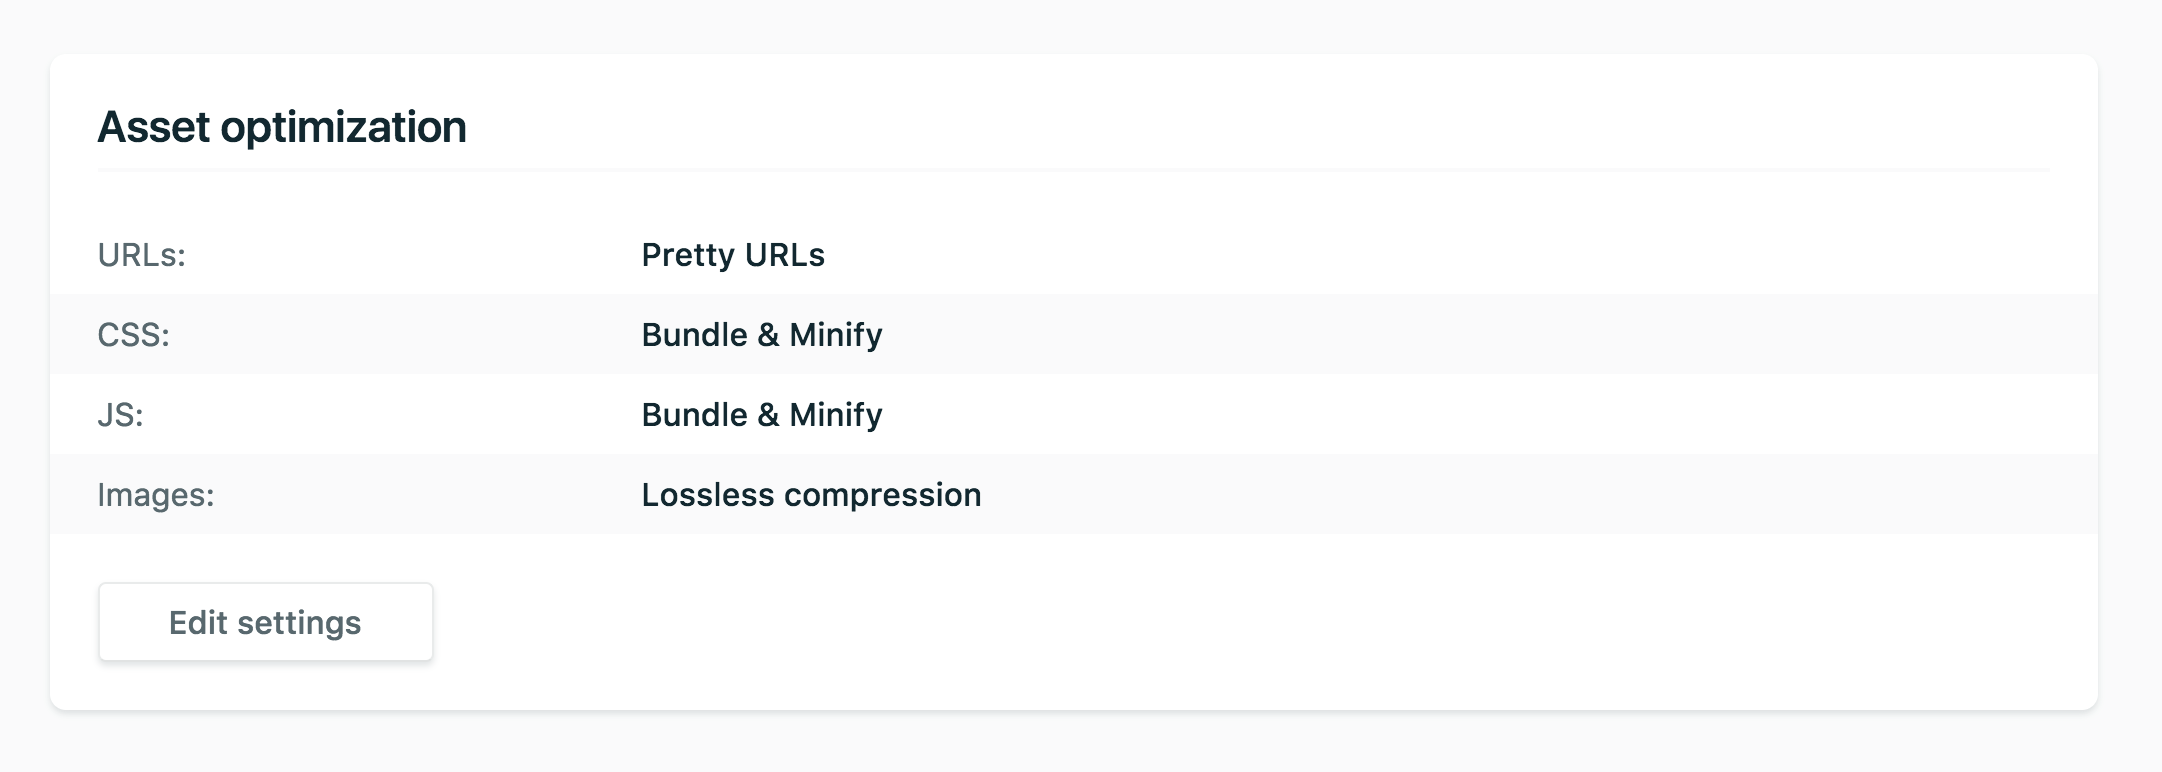
I saw quite a few performance improvements and more green A’s in the webpagetest.org results that used to be red before. I still have a few more improvements to make.
Summary of current set up
- This Web site’s source code is hosted on Github.
- I use Hugo as a static site generator.
- Pushing to repo automatically deploys using Netlify.
- Hosting with Netlify for free with the developer’s Pro plan.
It’s worth mentioning at this point that compiling my entire site now after every change, without having to filter out old articles or anything like that, takes Hugo no more than 40 seconds every time. To be more accurate, it takes Hugo around 39ms to compile my entire site now, compared to the minutes needed by Jekyll before, even after using flags like --incremental.
Future Plans
These include some but not all of the things that have been on my to-do list for the last couple of years that I have been postponing, partially because of the previous Jekyll situation:
- Starting a mailing list. This will be coming later this month.
- A new section on the site for articles that don’t fit into the technical articles section.
- Improving the site code enough to not be embarrassed by it anymore and make the repo public on Github.
- Make the site available offline. And make it even faster.
- There will be an AMA but not the traditional Github-hosted AMA. There are aspects of the Github-based format that I don’t like. More info and details will also be out as soon as the newsletter is.
- Write more frequently. I’m letting way too many ideas slip that I should honestly be turning into blog posts. I promised myself to write more even if the article ideas are not as deep-dive as my usual articles are. And this post is a start.
Final Words?
I’ll let Agnes express how I feel about my current setup, even though I know I can and will be improving some details more in the future:
At least for now I know I have a setup that won’t give me any headaches whenever I want to make any new changes to my Web site. I’m also enjoying writing articles for the blog again, which means that you can expect more to come in the next few weeks.
Thank you for reading.